
Seat belts in vintage cars usually live a tough life. Buckles become scratched and dinged. Labels yellow. And, to make matters worse, plenty of old cars happened to be new cars when social habits such as smoking were extremely common. The smoke permeates the belts and, in particular, the shoulder harness assemblies. Before long, the belts and harness begin to look like refugees from a wrecking yard. Seat belt restoration in a vintage or classic car is a necessary part of interior restoration.
While seat upholstery gets cleaned, vinyl dashes and door panels get scrubbed, and carpets get shampooed, most folks forget about (or ignore) the lowly seat belt and shoulder harness. That’s the bad news. The good news is, with a small amount of elbow grease and a few common cleaners, you can make the seat belt and shoulder harness assembly’s gleam like new (or even better than new).

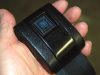

In our case, we have a pretty neat old Chevy Nova we’re slowly working on. While a super low mileage vehicle, time and past owners still took their toll on the seat belts and shoulder harness. We took all of the belts and harnesses out of the car, bagged and tagged them for restoration, thinking initially we’d have to send them off for a professional rework (which, by the way, can cost upwards of $1,000 for a five or six piece set).
But then we stumbled across a series of restoration suggestions by the folks at the Supercar Registry. Basically, it was a series of inspirational ideas from people who restored their own seatbelts. We figured we’d try it. With nothing to lose, and maybe $1,000 to save, the idea was a no-brainer.
Strip The Parts.
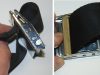
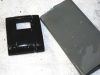
First things first: The belts and harnesses have to be stripped. To remove the buckles, first turn them upside down on a soft surface (a rolled up terry towel is perfect). Next, a couple of thin gasket or paint scrapers must be inserted into each side of the buckle (see the accompanying photo). By carefully sliding the scrapers in place, you’ll release the side attachment clips for the cover. Then insert a large flat blade screwdriver into the latch slot in the face of the buckle.
Rotate the screwdriver in the latch slot (maintaining steel on steel, rolling the latch off). The buckle cover will release, and the buttons will simply pop off. Repeat with the entire selection of buckle assembles, and remove anything else such as plastic covers. Set all of the hardware (fasteners, buckles, covers and so on) aside.
Wash and Wear.
Next up, it’s time to clean the bare belts and harnesses (keeping in mind you cannot remove anything sewn in place). We prepared a 5-gallon wash bucket with hot water along with a dash of common biodegradable automotive degreaser. Our belts weren’t excessively soiled, but they had their fair share of cigarette smoke residue. We used a mix of approximately 25:1 (12 fluid ounces of degreaser to 2.5 gallons of water). For belts that are heavily soiled, you might have to use a bit stronger mix.
With the belts completely submerged in the water/degreaser mix, simply stir occasionally and allow the cleaner to work. We continued this for a couple of hours. The belts were rinsed with cold tap water then we “recharged” the bucket with another mix of hot water and degreaser. We followed the same steps. Once again, the belts were rinsed. We kept rinsing until the water in the bucket came out squeaky clean.
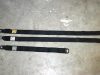
At this point, we strung the belts out on a section of steel doweling and draped it over a stepladder erected on the garage floor (one of the tips from the Supercar Registry). A good old-fashioned house fan was pointed at the belts. We simply allowed the fan to run at low speed until the belts dried (of course, that all depends upon the humidity level and the ambient temperature).
Polishing and Detailing.
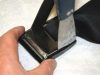
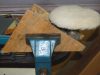
While the seat belts are drying, you can turn your attention to the buckles and covers. The basic buckles (the steel parts) can be detailed with good quality chrome cleaner. If there is any corrosion, a bit of polishing with fine (0000) steel wool will cure it. Buff and you’re done.
The plastic buckle covers are just as easy to detail. Here, we simply wet sanded the scratches with 2,000-grit sandpaper mounted on a rubber-sanding block. Just like automotive paint, we used a mix of household liquid dish soap and water as the lubricant. Be sure to flood the cover with the soapy water mix, as you’re wet sanding. By the way, if you soak the sandpaper overnight in a tray of soap and water, it works better. Next, the covers were hand-polished with a good plastic polish.
Finally, we applied a light coat of automotive paint swirl remover on the buckle bodies and buffed with a (damp) soft synthetic pad mounted on a Makita variable speed buffer (turned to low). It’s tough to handle the big buffer on a small pad, but once again the folks from the Supercar Registry came to the rescue, suggesting the buffer can be clamped upside down in a shop vice. We did that, but used a couple of pieces of plywood on each side of the buffer to keep the vise jaws from destroying the buffer. The results were fabulous.
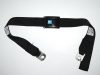
Finally, once the belts are completely dry, you can reassemble the works. The seat belt material wraps around the buckle (see the accompanying photos) and the covers and actuator button simply snap into place. We cleaned the associated mount hardware and plastic trim separately. And with that, you’re done. For a closer look, check out the accompanying photos. You might be surprised at how good the belts turn out!


