
Many maintenance jobs don’t require Mensa memberships. They can be time-consuming, though, which is a Catch-22: paying a repair shop saves time, but labor costs can be steep for multi-hour jobs, like rear strut repair. Replacing rear struts on many cars is do-able for the competent but patient home mechanic. Depending on the particular vehicle, the job can possibly be completed in a day or less using basic hand tools. Even better, professional wheel alignment often isn’t required after everything is back in place.


Is It Worth It?
Doing a little research will help determine if you can replace your own rear struts. Here are some preliminaries to consider:
1. Verify that the rear struts actually need to be replaced. Symptoms of shot struts include excessive body pitching during cornering and braking, the car bottoming out over bumps, and cupped tires.
2. Get a quote from a shop or a dealership. Normally, struts are replaced in pairs to ensure that the valving/stiffness is comparable side-to-side.
3. Price the parts, particularly complete replacement strut/spring assemblies if they’re available for your vehicle.
4. Search the various Internet owners’ forums and/or read a service manual for vehicle-specific particulars. Also realize that you might also want to replace ancillary wear parts such as brake shoes/pads, rotors, and swaybar bushings while the rear suspension is disassembled.
Other Considerations.
If you decide to tackle the job yourself, we highly recommend using complete strut/spring assemblies. This route can actually be more cost-effective than buying just the strut body. Swapping the old spring onto a new strut requires special tools and involves some danger. (Many professional installers have war stories about coil springs that broke containment and caused destruction.) The safest way to mount springs on struts is with a compressor tool, a purpose-designed vise that probably isn’t worth buying for a single job.
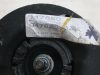
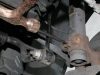
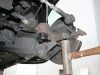
Unfortunately, complete replacement strut assemblies weren’t available for the 2002 Chrysler 300M Special used here. One strut’s swaybar mount had broken off, causing the car to clunk when cornering. The temporary fix was disconnecting the swaybar. This made cornering mushy.
Apparently sales of this car’s Special version were too low to justify manufacturing replacement rear strut assemblies. The 300M Special sits a half inch lower than the “normal” car, so using an available base-model replacement assembly would likely give the car a nose-low rake. (This is one example of a model-specific quirk revealed by doing some homework before tearing into the car.)
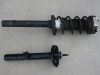
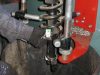
Our broken rear strut, which replaced its predecessor only 20,000 miles ago, is likely covered under warranty. But since labor normally isn’t covered and we didn’t want to risk getting another potentially defective OE-replacement rear strut at the dealership, we decided to upgrade to Monroe Sensa-Tracs. This involved removing the old struts and having the existing coil springs professionally installed on the new Sensa-Trac bodies.
Our local tire shop charged $25 per strut, allegedly their “preferred customer” price. The old coil seats, boots, and snubbers weren’t in great shape, but we reused them because we wanted to get the vehicle back together and these were special-order parts. The gist of all this: Replacement strut assemblies are the way to go if they’re available for your application.
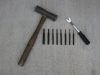
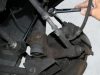
No special tools were required for this job. The repair manual recommends using a brass drift for pounding the spindle off the strut. This minimizes mar-marks to the spindles. Our local home-improvement and tool retailers didn’t stock brass drifts, so we decided to use a brass hammer instead. A normal hammer would work if possible pound marks on the spindle aren’t a concern.
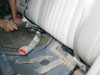
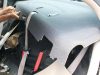
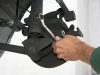
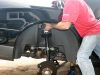
Also, this job involved removing the rear seat and shelf to access the upper coil mounts. The side panels had to be popped out too. A trim removal tool is useful for this, although a putty knife, screwdriver, or even fingers might also work. Regardless, disassembling the interior before raising and securing the car makes the job a little easier.
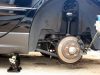
Be prepared to replace other parts during strut replacement. Our brake pads were nearly worn to their squealer tangs, and the upper swaybar link bushings were torn on both sides. So, budget time for at least one parts run mid-job—or stock up on everything you might potentially need when buying the struts then return what you don’t use later. If the car is a daily driver, we’d recommend starting early on a Saturday, since parts and services, such as strut assembling, are harder to come by on Sundays.
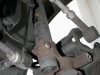
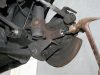
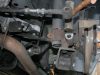
Finally, the manual calls for setting the car to ride height prior to tightening the bolts that hold this car’s lateral links to its spindles. The book recommends using a floor jack to raise the spindle to approximate operating height. (Space is too tight to get a socket and torque wrench on the bolt after the wheel installed.) Instead, we play Backyard Bubba Engineer: We installed the tire/wheel, lowered the car onto the ground, counted the necessary twists of the jack to raise the car high enough to remove the tire, lowered the jack the required amount to put the car back at ride height, slid wood blocks under the spindles as jack-failure back-up then torqued the bolts while keeping all body parts clear of the car. (We’re overdue for an earthquake in Southern California.)
At the end of the day, replacing rear struts at home should be accomplishable for many home mechanics. Do a little research first to see if your particular car has any quirks that’d make a rear strut repair job better suited for the professionals.


